Tuesday, August 30, 2011

Constitution Stitch

So, I've apparently been so busy making things that I haven't kept up with the blog. Sorry. I've not only been cooking up lots of fun stuff, but have been planning craft projects, too. I'm planning out future knitting projects so I can adhere to the old addage "A stitch in time saves nine". I like to stitch while I'm doing just about anything else that occupies my ears. I could be (listening to a podcast and) keeping my hands busy while I wait for something, while I ride as a passenger in the car, or when conversing with someone. Pretty soon nine stitches in time will save 81!

I've started brainstorming for original designs for cross stitch, too. I tend to get carried away with one thing at a time to the neglect of all the other projects I have going on. I used to spend at least 20 minutes a day with my plants, but not so much. I'll update on that later. So. This was a project I undertook two years ago. I wanted to make a present for my mom's birthday, and saw a shirt I saw from Mental_Floss that I thought she would like (she's very patriotic, and I thought she'd love the cleverness). But I couldn't imagine her wearing a t-shirt like that a lot, and what if I got the wrong size?  I frayed the edges and attached some cardboard to the back to make it keep its shape.  


Yeah, so not the most impressive thing I've made (you'll see that coming up later). I just like the idea of capturing words like that in such a crafty way... it was an inexpensive handmade gift, can't beat that, right?

Sunday, August 28, 2011

Perfect Tuna Sandwich: Creamy, Crunchy, Savory

I've always loved tuna sandwiches and have made it many ways. This is probably the default way I make it because I've found this formula to be fail-proof. It's creamy, it's crunchy, and it has a yummy, savory flavor to it. I love the lightly toasted bread, the melty cheese, and the lettuce and tomato (and occasional pickles). These are the quantities I used to make the tuna "salad", but if it seems like too much of something or not enough of the other, you make it to your tastes!

Tuna "salad"
1/3 cup minced onion (use a mild onion, or leftover)
1/3 cup minced celery
5 oz can of chunk light tuna
1.5 - 2 tbsp mayo
1.5 - 2 tbsp softened cream cheese
1/2 tsp Badia complete seasoning (I use this with just about everything)

Sandwich stuff:
Lightly toasted bread (once the tuna salad is done)
Slice of American cheese (or other- provolone sounds nice!)
Slice of tomato
Lettuce


I shop at Costco these days, so I'm stocked with cream cheese and mayo to last for ages.


Throw all the ingredients in a bowl. Mix with a fork until creamy and well- blended.


This stuff would go good on crackers.


There you are. Toast your bread to your liking (we used Oatmeal bread) and place the cheese slice between the piping hot toast to melt. After it has softened/melted a bit, throw your tomato & lettuce and pile on the tuna. I added pickles, too. It's a classic tuna sandwich in my book!

Saturday, August 27, 2011

Fresh veggie egg skillet

Remember the cilantro I used in my Guacamole? I had to think of what I could make with the leftovers, and I came up with this dish that wafts up the aroma of fresh veggies while it cooks. This is my favorite way to make eggs. I love cooking with fresh veggies! Here's what I used, but you can ad-lib as you please. This is very veggie-heavy.

Fresh veggie egg skillet
2 small baby portabello mushrooms, chopped or sliced
1/2 large tomato (or 1 small), diced
1/4 cup diced red & green bell pepper
1/4 cup diced onion
2 small cloves garlic
1 tsp bacon fat, oil, or butter (butter or bacon fat taste the best)
4 eggs
cilantro, a couple of sprigs washed & chopped
salt & pepper, to taste
1/4 tsp badia complete seasoning
1/2 cup shredded cheddar


One of the great things about making eggs is that you can throw in just about anything you want in any quantity you have on hand. Don't scrutinize quantities, it turns out great regardless!


Cook mushrooms, onions, bell pepper and garlic in bacon fat, covered over medium heat until veggies turn soft.


Throw in the tomatoes to heat for a couple minutes while you beat your eggs in a small mixing bowl.


Add the eggs by pouring slowly right into the center of the pan. Turn heat down slightly to just under medium. Now you're going to want to sprinkle on your salt, pepper, and other seasonings if desired.


Wait a few minutes for the bottom layer to cook, then scrape the egg off the bottom and sides of pan, allowing the liquid to take its place and cook.


Repeat until all your eggs are cooked.


When your eggs are all cooked, now you want to add the cilantro and mix it up (alternatively, use as a garnish).


Sprinkle the cheese on top and cover. Turn heat to low for one minute to allow the cheese to melt (it should be quick).


It should look like this when you're done. This should be enough for 4 people for breakfast, accompanied by toast if you like. We split it as a big brunch meal. It's best fresh, and we sure didn't let it go to waste!

Friday, August 26, 2011

Mom's scarf

I've been so productive lately! Last weekend we exhausted ourselves with yard work, and it seems to go back to chaos again in no time. Those weeds... My tomatoes are not doing well. I can't give up now, though. Must try again after the rainy season is up. The hurricane decided to veer east, so that's not a problem at the moment, but who knows what storms September will bring.
I also cooked a lot this past weekend. Coming up: a breakfast, an Americanized version of a Russian dish, an Americanized version of a Thai dish, and an ad-libbed (and Americanized) version of and Indian dish. They each turned out to be a huge success, and were pretty simple when all was said and done. More on that soon!

Back to the scarf: I made this for my mom back in January. It was a late Christmas gift, but in time for her trip in February. I will pretty much have to post gift items after the recipient gets it in case they might be tipped off by the blog :/
It was the second scarf I ever made, and it was the first time I made anything lacy (using YO, K2tog to create the holes).The pattern is very easy! I would recommend it for beginners who want to show off some skill. It took me all of 5 days to finish.  I could have planned it out better, as far as the colors were concerned. The yarn was so soft and beautiful but the beginning end of the scarf was all fuzzed by the time I finished the whole thing. I used Bernat Roving yarn (an acrylic/wool blend), and 8mm (size 11) needles. The finished size was 6' x 64". It is incredibly soft and comfy!


The pictures are pretty awful and don't do the color and texture justice.


That's my mom in her native MN in February wearing the scarf. I love the pattern and would probably try it again in a thinner yarn (it's hard to say because there are so many patterns calling my name, but only so many materials available). The pattern for this (as for most of the stuff I've made so far) is from Ravelry. Check it out!

Monday, August 22, 2011

Come on, Irene

So.... planting season in SoFla coincides with the months with the harshest and most frequent hurricanes. Now I'm rethinking planting this Saturday considering a hurricane is predicted to hit Friday. Maybe I ought to wait till October. Yes, the title is a reference to the song "Come on Eileen" with the name of the hurricane. ^_^

My tomatoes have been suffering from the whiteflies (those son-of-a-Bs) so I made some insecticidal soap and threw in some cayenne. It doesn't seem to be working so far. Two of my bell peppers have been viciously attacked by snails. It's rather discouraging. I saw beautiful photographs of colorful, luscious veggies and dreamed one day I'd be able to harvest some of my own. We'll see.

I've been busy with cooking up lots of great stuff this weekend, so that guacamole recipe (which is awesome IMO) was just an afterthought. After taking so many pictures and chopping so many veggies, I thought what-the-hey, why not? I've also been knitting up plenty of mermaids and cupcakes (look to the right for a preview!) as well as plotting future projects and prepping my stash. Look for more works-in-progress, recipes, and finished crafts soon. I finished Link, I just have to frame him now (I love that I just added a link for Link). That's all for today!

Sunday, August 21, 2011

Summer Guacamole

Summer is almost over, but avocados are in season right now. I adore avocados. When I see one that is so perfectly ripe and fresh, the most delicious thing I can do to it is cut a slice, then sprinkle salt and lime before eating it. It's also great on sandwiches. I've tried a croquette sandwich with just tomato and avocado on Cuban bread, and it is worth repeating. I truly appreciate the simple, creamy flavor of avocado but on the other hand, who doesn't love guacamole?

Two ingredients that will make your guacamole: fresh lime juice, and fresh cilantro. Two tips for using these: use every part of the cilantro- those stems are not taboo! They are flavorful, edible, and chopping them with the leaves reduces a lot of work involved in their separation. As far as the limes go, I read a great tip from Budget Bytes: if you microwave them for 20-30 sec. you can get more juice out of them! Lo & behold it is true! Just don't burn yourself. This guac will be sublime, just you wait and see. 

Here's what you need:
2 large, ripe avocados
2 small cloves of garlic, crushed
1 tsp cumin
1 tsp salt
2 fresh limes
pinch of cayenne
1/2 tsp paprika
1 tbsp olive oil
1 tomato, finely diced
1/2 large onion, minced
3 tbsp washed & minced cilantro (stems and all!)


Quarter your avocados and peel off the rind. Throw them in a large mixing bowl and mash them. I used a hand mixer. Add the garlic, salt, spices, olive oil, and lime juice and mix well into the avocado puree. (sorry, no picture of this step!)


I mixed in the cilantro, onion, and tomato last.


The avocados were the perfect texture! Look at that good stuff!

Saturday, August 20, 2011

Steel-Cut Oatmeal

This is something my husband made the other day, and it was arguably the best oatmeal I've ever had. I mean, this is the way I want to have oatmeal from now on! Here's how he made it:   

For the oatmeal:
1 cup steel cut oats
1tbsp butter
4 cups water
salt
Toppings:
cream
brown sugar
cinnamon
nutmeg

Toast the oats with butter in a saucepan over med-high heat. This takes just a few minutes. Turn the heat down and let the oats cool while you boil the water.


Measure the water into the saucepan with the oats, cook over med-low heat for about 15 minutes.


Add a pinch of salt, stir. Then cook for another 5-10 minutes until the oatmeal reaches the desired consistency. 


Add whatever toppings you like: cinnamon, nutmeg, cream, brown sugar, honey, maple syrup, fruits, etc. My personal favorite is with some cream, brown sugar, and spices.

Monday, August 15, 2011

Jorge's scarf

So, we may live in Miami, but apparently there are like 14 days of the year we need warm clothing! Not now, of course. I can't imagine wearing anything resembling a scarf now. However, I'm in knitting mode and want to go back to the first recent project that brought me to be the fanatic I've become. Last December (2010) I decided to pick up knitting again. Now that you've seen the mermaid I'm working on, this won't seem so special, but this was the project that rekindled my love for knitting. It was almost 2 years since I finished this blanket, and I wanted to do something planned this time. I asked him what he liked more or less, but I knew I was pretty much going to make it like this.


His grandmother lent him a scarf she made for his grandfather, and I wanted to imitate it. Here's a picture of me freezing in the March rain in NYC wearing that scarf:


Yes, that's right. She lent him the scarf and I ended up wearing it. That's love for you!
I cast on 39 stitches and used the basic moss/seed stitch on 5.5mm (size 9) needles. Here's a close-up of the stitch:


It feels very spongy and flexible. I used Lion Brand Wool-Ease, which is an acrylic/wool blend. Yeah, I know that there are people out there who swear against using any yarn you can buy at Joann Fabrics, etc. but let me just say this: I would indeed like to have my cake and eat it too. I cannot afford to spend $100 on yarn for each project, so I will fund my hobby with what I can afford. I don't want to give it up entirely rather than compromise on acrylic blends (or acrylic yarn). I know it won't last forever, but I'm gaining valuable experience!


If I were making the dimensions to wear myself, I’d cast on only 25-30 stitches and make it longer. I definitely don't mind a long scarf! I think it's better for two reasons: One, it's less heavy for when you don't want to be completely enveloped; and two, it's easier to wrap around.


Jorge loved it, though. He was so impressed that I made it for him that now he wants me to teach him to knit. Here he is enjoying the scarf I made for him:


By the way, my darling husband has created a Ravelry gadget where you can preview all of my projects!  Look to your right. Until next time folks, keep calm and knit on.

Sunday, August 14, 2011

Still Alive: my potted garden is surviving the summer

Things are growing, but not as well as they could be. Maybe because I haven't been babying the plants so much and whiteflies are a big problem with the tomatoes right now. They are the only plants I have outside, the rest are in the screened patio (which is kinda crowded now).

Oh, I almost forgot. When I said that we only had our tomato plants outside, that wasn't true. We have a new addition! My mom told us that my brother dug up a banana baby that their plant propagated, but it was sitting out for days without soil or water. It looked dead. But lo & behold, it sprouted new growth! It even produced two offshoots of its own. We put it in a pot for the time being because we needed a place to put it immediately.


Below are my poor tomatoes. Still getting taller, but showing signs of distress from those whiteflies:


I really need to stake the tomatoes. I kinda don't know what I'm doing.


The first parsley picture is one I planted after the bottom picture. The top picture was planted about 5 weeks ago, and the bottom picture was about 8 weeks ago. It sort of hasn't grown in a while. The thing that I find the strangest is that when the first one sprouted, it was tiny. The second one immediately was enormous (and healthy looking) from day one.

Above: My Oregano plant. It's shaped like a cyclone: It is tiny near the root and large on top. Not sure why that happened...


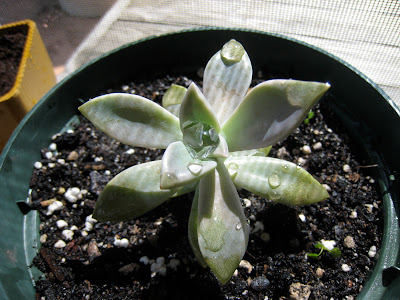
Above: My beautiful hen & chicks plant (Echeveria Amoena I think). I broke off a leaf and gave it to my grandmother-in-law, and it already grew a rosette within a month. Cool!


Finally, my bell pepper. I really want this one to succeed. I so would love homegrown peppers! It's grown so much since the first post I made about them less than a month ago.

Saturday, August 13, 2011

Amigurumi Mermaid

I've loved mermaids ever since I was young. I used to believe I could become one after watching the movie "Splash" (which after seeing recently, I have concluded that Disney imitated bigtime). Well, I noticed a little amigurumi mermaid I had favorited on Ravelry, and sought a better one. Like my quilt, I wouldn't just start with something easy- I had to start with my ideal even if it was beyond my skill level. My husband says that I jump right into things. Unfortunately, sometimes I get ahead of myself and take a long time to finish. Here's how I started.

I bought the pattern here and went over the abbreviations. I watched videos on youtube to help me learn each technique. If I can learn algebra, I can learn this! It's not so hard, it's just foreign. Once you learn how to do the different stitches, it's as simple as keeping track of where you are. A post-it and a pencil help. This project spurred me to buy a stitch marker which is a life saver. I started making quick progress the first day and could see the tail taking shape! I started it on August 2nd.  A week later I was almost done, but the hands were a little slow-going. I messed up on one arm and had to frog it (which means unravel the progress I made). With some tenacity, I may finish this weekend (or in a few days) and I'll post the finished product and the stages of finishing her: stuffing her, sewing her, attaching her hair and embroidering her features. It took a lot longer than I thought just to start stuffing her! It's turning out great, though.


Having these disembodied limbs laying about make me feel like the Ice Truck Killer.

 I have this itch to make more things that my fingers can't keep up with. I want to go knit ALL the amigurumi now.

Friday, August 12, 2011

The cake is a lie

In early 2009, my darling husband acquired the game Portal and promptly played through the brief game. I sat and worked on my blanket while I watched, and we both greatly appreciated the dry sense of humor woven throughout the game. The ending song Still Alive was one that he really liked, enough to acquire the entire discography of its author, Jonathan Coulton. I listened to it all before he did and to this day it has been one of our most loved musicians. We saw him twice, and one of those occasions we had front row seats when we saw him on our honeymoon! 
Back on topic, he is a huge Portal fan, like I imagine anyone would be after playing the game. For his birthday, I made this for him:


It's a little funny because it say "The cake is a lie" and it shows a chocolate cake, and I gave this to him for his birthday... and in a sense the cake was a lie, because he hates chocolate. It's a cake he will never have.

Wednesday, August 10, 2011

Ice Cream Filled Cupcakes

These were the second filled cupcakes that I ever made. I'm going to post the first once I find the recipe. These are simple. I made them from a box, but you can use any basic cake recipe. These mint chocolate chip ice cream & chocolate cupcakes were for my mom's birthday this year. 

I used one particular source for reference for the whole ordeal- This is where I got the recipe for the ganache. It's 1 cup semi-sweet chocolate chips and 2/3 cup heavy cream. The recipe says: "In the meantime, melt the chocolate chips and the cream in a microwave safe bowl. It will only take about 2 bursts of 30 seconds each to melt the chocolate. You may need to mix the cream/chocolate for a few minutes to thoroughly incorporate the two. The mixture may look a little thin at first, but it will thicken as it cools."

Two helpful tips for the ganache: First, I've had better luck melting chocolate in a plastic container. Ceramic or glass heats up too unevenly. Remember to mix well to allow the heat energy to transfer evenly and the hotter parts will cool down when their energy warms up the cooler parts. Basic science! Secondly, the mixture will be drippy at first. I reccommend leaving it to cool in the fridge for a while until it's thick and pasty for ease of spreading. Here's how they came together for me:


Step one: Bake the cupcakes with liners. Allow to cool completely (you don't want to melt your ice cream any faster than they already do!)

Step two: Cut a cone out of the center using a paring knife held at a 45 degree angle. (It's like cutting the stem out of a tomato but wider). The goal here is to leave an edge but make it deep & wide enough to accommodate your filling. The shape of your cone will determine how much space will be left. (Try not to make it too deep or wide or it won't have a structure to hold in the filling!)

Step three: Take the cone you just cut out and slice off the pointy end, leaving just a lid for your topping. Repeat with all your cupcakes. Pictured below from L to R: Hollowed cupcake, lid, and cone tip. The pile is the crumb mixture leftover. (You can totally eat this part or make cake pops with it if you're feeling ambitious).


 Step four: Spoon in softened ice cream of your choice (just softened enough to spoon easily, not melted!). 5 mins out in room temp is enough to get it pliable. I used mint chocolate chip, my mom's favorite.

Step five: Replace the little lids and stick all your cupcakes in the freezer. Try to avoid letting the ice cream melt! Don't worry if they look messy, your topping will cover that.


Step six: After at least half an hour in the freezer (when the ice cream is frozen, basically) take out your cupcakes and top with topping of choice. I made chocolate ganache. When they are all covered, pop them back in the freezer.


Step 7: Before eating, let them thaw for a couple minutes. (It's too hard to bite if you don't! They can sit out for a few minutes before melting, and are just delightful.)


Then, enjoy! Guests will love sharing these with you, and they're so easy to make! You just have to have the patience to wait for them to re-freeze. Keep frozen in a tightly sealed container or they will get stale on you. They probably won't last long, but I hear they're fresh for 3 months