Showing posts with label dessert. Show all posts

Wednesday, September 21, 2011

Apple Pie Cupcakes (with caramel whipped topping)

All, right! So, I've had this thing not quite ready to post for ages now. I actually have quite a few things to blog about, but am reading my 9th book in <2 weeks. Right now, I'm on the 4th book of the Harry Potter series, and people were quite right in saying that I would enjoy them. I think I'm going to try and see how many books I can finish before the end of October, because I got my kindle for my birthday last year and have been keeping track of how many books I've read since I got it (a disappointing 21 so far- I want to make it to 30!)

Back to the cupcakes. I made them for my husband's birthday in May, and have been needing to blog it for a while because it's one of the best desserts I've made. I threw this together before the ice cream cupcakes, and had to hide them in the fridge for a surprise party! I based the filling from this blog and the frosting from here.
What you'll need:

For the cake:
1 box cake mix plus egg, water, butter (whatever it says on the box).
Or cake batter from scratch recipe of choice
Bake them in cupcake papers and let them cool.

For the filling:
3 cups of cored, peeled, and diced granny smith apple
2tbsp butter
3tbsp sugar
2 tsp cinnamon
1 tsp nutmeg

Heat butter, cinnamon, and sugar on med-high for a minute. The mixture should bubble a little. Throw in the diced apples and turn it to medium. Cover the apples in the cinnamon sugar mixture and heat until soft (about 10 mins). Let it cool before adding to your cupcakes! 

For the topping:
2 cups heavy whipping cream
6 tbsp granulated white sugar
1/2 tsp water
1 tsp vanilla
Okay, this is a bit trickier than the first two steps. Making caramel is pretty simple, but if you goof it gets too sticky. You can, however, salvage a mess and use it for this recipe as I did. My mistake? I didn't stir the sugar enough! I read from this link

"Prepare the caramel sauce. Combine the sugar and water in a heavy saucepan and stir well to mix. Put the cream in a second small saucepan (or put in the microwave proved measuring cup). Place the first pan on medium heat and cook undisturbed until the sugar begins to melt and caramelize-you’ll see a few wisps of smoke coming out of the sugar. Reduce the heat to low and stir occasionally so that the sugar melts and caramelizes evenly. Remove it from the heat when the caramel is still very pale (the sugar will continue to darken off the heat). Slide the pan with the cream onto the burner. As soon as the cream has some bubbles around the edge (if using microwave put the cup in the microwave and heat for 1 minutes), add it to the caramel at arm’s length, averting your face-the caramel will boil up and may splatter out of the pan. Pour the diluted caramel into a medium bowl and cool it to room temperature."

It says "cook [the sugar] undisturbed until the sugar begins to melt and caramelize". If you haven't done this before, let me warn you to be vigilant! I left it too long before lowering the heat and stirring. If you're not sure if the sugar is caramelizing yet, toss it around in the pan to check for signs. Again, don't let this keep you from trying this combination of apples and caramel whipped cream- you will NOT regret it even if you mess up!
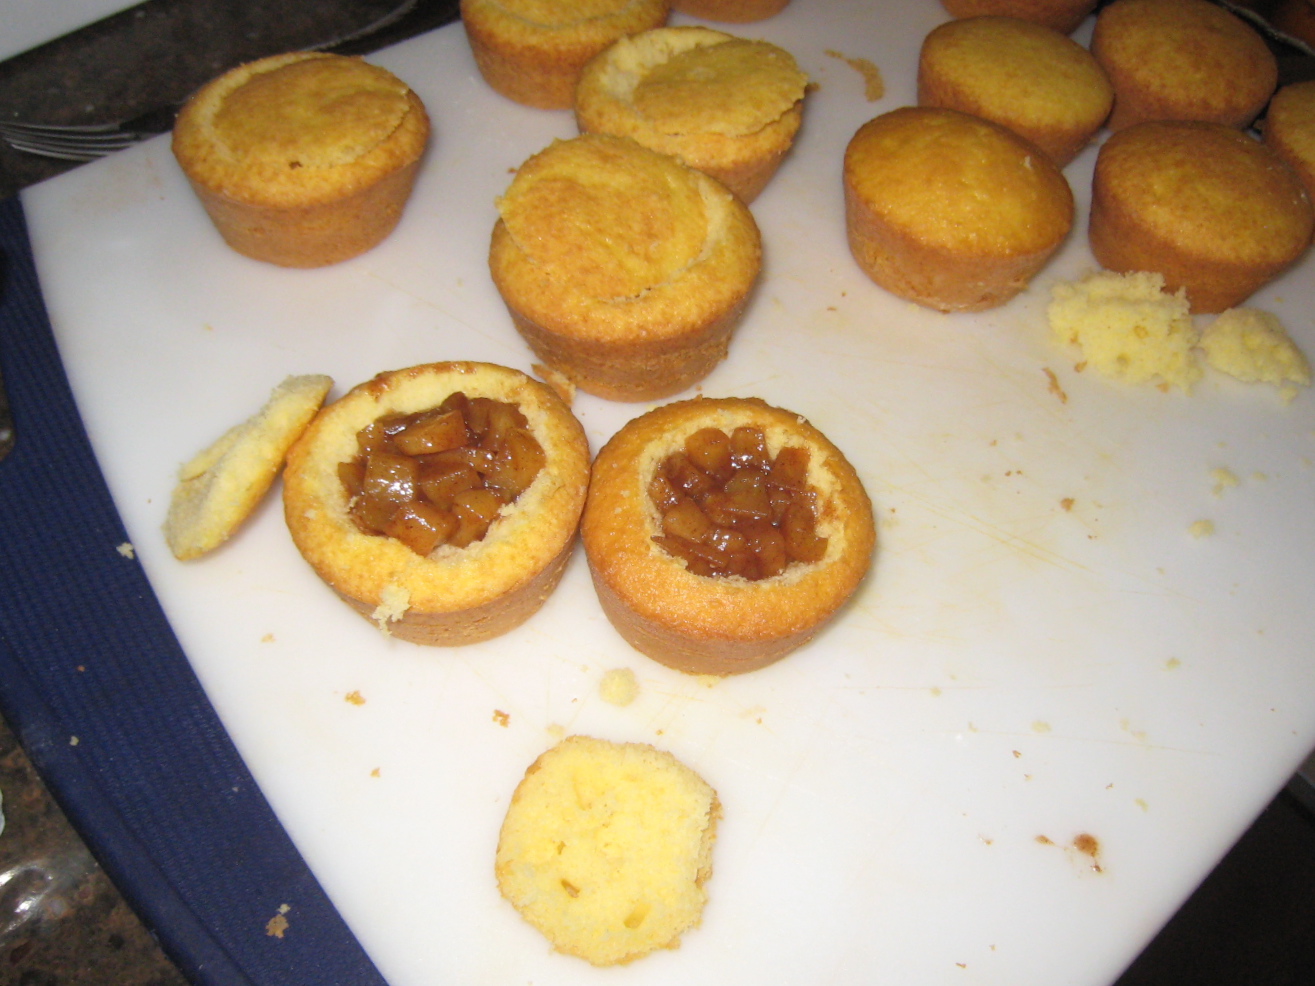

I baked the cake and hollowed out the cone shapes like I did with the ice cream cupcakes. Then I added the apple filling and put the lids on. 


Set them aside while you work on the topping.


Looks like caramel, right? Well, mistake #2- I wanted dark caramel. It was super sticky! I lost a lot of it, but the good news is, it washes out really easily with hot water.


Mixing the caramel with the rest of the cream- this is when it really started to come together. I thought there was no way the cream would whip up stiff peaks with all that sticky caramel, but it didn't let me down! The result was worth the effort.


Mmm, look at the surprise inside! My husband loved these for this 30th birthday.


Wednesday, August 10, 2011

Ice Cream Filled Cupcakes

These were the second filled cupcakes that I ever made. I'm going to post the first once I find the recipe. These are simple. I made them from a box, but you can use any basic cake recipe. These mint chocolate chip ice cream & chocolate cupcakes were for my mom's birthday this year. 

I used one particular source for reference for the whole ordeal- This is where I got the recipe for the ganache. It's 1 cup semi-sweet chocolate chips and 2/3 cup heavy cream. The recipe says: "In the meantime, melt the chocolate chips and the cream in a microwave safe bowl. It will only take about 2 bursts of 30 seconds each to melt the chocolate. You may need to mix the cream/chocolate for a few minutes to thoroughly incorporate the two. The mixture may look a little thin at first, but it will thicken as it cools."

Two helpful tips for the ganache: First, I've had better luck melting chocolate in a plastic container. Ceramic or glass heats up too unevenly. Remember to mix well to allow the heat energy to transfer evenly and the hotter parts will cool down when their energy warms up the cooler parts. Basic science! Secondly, the mixture will be drippy at first. I reccommend leaving it to cool in the fridge for a while until it's thick and pasty for ease of spreading. Here's how they came together for me:


Step one: Bake the cupcakes with liners. Allow to cool completely (you don't want to melt your ice cream any faster than they already do!)

Step two: Cut a cone out of the center using a paring knife held at a 45 degree angle. (It's like cutting the stem out of a tomato but wider). The goal here is to leave an edge but make it deep & wide enough to accommodate your filling. The shape of your cone will determine how much space will be left. (Try not to make it too deep or wide or it won't have a structure to hold in the filling!)

Step three: Take the cone you just cut out and slice off the pointy end, leaving just a lid for your topping. Repeat with all your cupcakes. Pictured below from L to R: Hollowed cupcake, lid, and cone tip. The pile is the crumb mixture leftover. (You can totally eat this part or make cake pops with it if you're feeling ambitious).


 Step four: Spoon in softened ice cream of your choice (just softened enough to spoon easily, not melted!). 5 mins out in room temp is enough to get it pliable. I used mint chocolate chip, my mom's favorite.

Step five: Replace the little lids and stick all your cupcakes in the freezer. Try to avoid letting the ice cream melt! Don't worry if they look messy, your topping will cover that.


Step six: After at least half an hour in the freezer (when the ice cream is frozen, basically) take out your cupcakes and top with topping of choice. I made chocolate ganache. When they are all covered, pop them back in the freezer.


Step 7: Before eating, let them thaw for a couple minutes. (It's too hard to bite if you don't! They can sit out for a few minutes before melting, and are just delightful.)


Then, enjoy! Guests will love sharing these with you, and they're so easy to make! You just have to have the patience to wait for them to re-freeze. Keep frozen in a tightly sealed container or they will get stale on you. They probably won't last long, but I hear they're fresh for 3 months

Thursday, July 21, 2011

Mango dessert sauce

Remember the Mango Crisp? We had loads of leftover mangoes, so I made some sauce for ice cream.
 This is so subtle and delectable. I'm not a big mango fan, but we used the sweetest, most ripe and perfectly textured mangoes that I suddenly became a fan. I'm a huge fan of this sauce. Suddenly I want all ice cream to be smooth vanilla with heaps of this creamy sauce on top. You could probably even put ice cream in the blender with it and make a mango shake with lime and rum! I mean, forget ever going out for dessert. This is goooood. It's so simple. If you love mangoes, you'll love this!

Cut your mangoes into chunks. The size doesn't matter because they are going into the blender. Read this article if you're unfamiliar with scoring a mango. I prefer to scoop them out with a spoon, but a blunt knife works. Plop them in the blender. If you're like me, you can save the juices or suck them off the skin and seed. So juicy. Add turbinado or sweetener of choice (It strangely is not overly sweet) and add the rum. Puree until chunks are gone. Refrigerate. That's it!
I put about 3-4 cups at a time into the blender. (5 mangoes gave me about 6 cups)
I added 1/4 cup turbinado (brown or white sugar if no turbinado on hand) and
1/4 cup rum (dark rum preferred).
I added the juice from 1/2 a lime for each batch. I think it was about 1 tbsp.


I made it before with turbinado, and I think it tasted better. Fresh, ripe (but not over-ripe, slightly firm) mangoes give the best flavor.


The rum gives a slight flavor, (but a good one!) so add more or less to your tastes. Omit if you desire.


This was the product of 5 mangoes. I stuck them in the freezer!


The texture is like runny jello. I would recommend serving it from the fridge, not at room temperature. Serve over ice cream, cheesecake, or dessert of choice. The internet tells me it will keep for months in the freezer. I've kept a batch for 2 weeks in the fridge, and it looks more translucent but tastes just as good. Don't take my word for it, though...

Tuesday, July 5, 2011

Mango Crisp

Saturday was my father-in-law's birthday, so we went over Sunday for lunch.  I made mango crisp for the family because his dad tends to like my baked goods. As we established in my last post, I'm probably better at baking than frying. I've looked at many different Crisp and Cobbler recipes, and they seem very flexible. This is the original recipe I came up with based on research for both- I wanted to make something delectable in my foolishness.Yes, I haven't learned yet not to experiment with something I've never made before. It's worked for me in the past, so I'm trying it again. After all, this wouldn't really be an enterprise if I wasn't challenging, right? Well, I gave this guinea pig a try Sunday, so Monday's is slightly different. Here's today's recipe:

Mango Crisp

Filling:
6 - 8 cups  diced mango or 4 - 5 ripe mangoes (or whatever is on hand to fill the pan)
1/4 cup rum (to 1/2 cup for more flavor)
2 tbsp lime juice (approx 1 lime)
1 cup sugar
1tbsp cornstarch
1/2 cup water
2 tsp cinnamon
Crisp Topping:
1 1/2 sticks (12 tablespoons) butter, melted
1 cup all purpose flour
1 1/4 cup rolled oats
1 cup brown sugar, packed
1tsp cinnamon
Pinch of salt

Topping:
Mix dry topping ingredients in a bowl.  Stir in butter, set aside.

Filling:
Cook the water, white sugar, cornstarch, mangoes, lime juice, and cinnamon for about 20 mins. on low (after you bring to a boil). ** Note: if you want less liquid, add less liquid or more cornstarch**
This will create a more jelly like texture and reduce the water a little (It thickens after cooling from the oven). Mix in the rum, then pour into a greased 9" x 13"baking dish.
Twist a fork into the topping to fluff it up, and sprinkle the crumbs onto the fruit. The liquid from the fruit will have a thick but watery consistency, so large crumbs will sink in. Sprinkle entire mixture over the top. Put tinfoil under pan to catch drippings, bake it for 35-40 mins. on 375°  or until topping is golden brown and filling is hot and bubbly. Serve with whipped cream or ice cream.


We seriously had more than 25 mangoes at home. Jorge's grandfather has 3 trees bearing fruit right now. (Not all are pictured here)


I diced them, but you can slice them. I cut the two sides off center (the pit is in the center) and then scored them into squares, then I removed the flesh with a spoon from the skin. Then you'll want to get more flesh from around the pit.


 Jorge measured the dry topping ingredients here, and mixed them well before adding the melted butter.


I piled up the lime juice, sugar, cornstarch and cinnamon on the mangoes, heating it just above medium until it boiled, then turning it to low for 20 minutes. I added the rum afterward, but you can do it however you like.


The topping next to the filling. The topping gets compact, so you'll want to fluff it up with a fork so you can sprinkle it on top and keep it aloft.


I did a quick spray with PAM but I suspect it's not necessary.


Ready to go into the oven.


Fresh out of the oven. See how the topping sinks in? You can omit the water, but I think it gives a nice sauce that mixes well with vanilla ice cream!


More sunken topping. It didn't affect the flavor, don't worry.

I used 5 ripe mangoes and it yielded about 7 cups. I would also like to try this with coconut milk instead of water, and shredded coconut and macadamias mixed in the topping. I suppose you could also use bananas and other tropical fruits... I think a tsp of vanilla would have added some charm, but then it's getting more like apple crisp than a tropical flair. Experiment as you please!